Posts Tagged ‘BeiTown’
Unity WebPlayer之间调用JS Post方法传参
星期六, 五月 24th, 2014 630 views首先是功能需求的描述:我们需要在两个WebPlayer之间互相传递参数,其方法是在WebA中的Unity调用一个JS方法将参数进行一个post提交并跳转到WebB中,并在WebB的Unity中获取这个post的内容。
以上方案涉及到几个内容:
i 在Unity中调用Html中的JS方法并传参
ii Js的Post方法
iii Unity获取当前页面中的post内容
下面将逐一讲解:
①在Unity中调用Html中的JS方法并传参
代码如下
Unity中:
1 2 3 | void Start () { Application.ExternalCall( "testFunction", "testMessage"); } |
这里的testFunction是JS中的函数名,testMessage是我们传递的字符串内容,JS代码这样设计
1 2 3 4 5 | function testFunction( arg ) { // show the message alert( arg ); } |
此时将Unity打包成WebPlayer,命名为WebA.html,运行效果如下:

(更多…)
Protobuf-net在Unity中的序列化与反序列化
星期日, 五月 18th, 2014 1,310 views本篇中我们只讲解如何在Unity中对Protobuf-net进行序列化(Serialize)与反序列化(Deserialize),关于Unity的socket网络通信部分我们后续开篇。
首先去Protobuf-net的Google下载点下载protobuf-net类库:https://code.google.com/p/protobuf-net/downloads/list
这里用的是目前最新的protobuf-net r668
下载完毕后打开压缩包,在Full\unity中找到protobuf-net.dll将其添加到项目中。
接下来过程其实类似于我之前的一文章《Protobuf在Java中的简单实例》。
①创建proto文件,定义协议格式
首先我们需要创建一个.proto文件来进行测试:
1 2 3 4 5 | package com.beitown.net.msg;//包名 message TestMsg { required int64 Id=1; required string Name=2; } |
每个字段后标记的“=1”、“=2”这里就不解释了,之前的一篇Protobuf文章中已经做过概述。
②编译Proto文件生成.cs文件
这里我们需要用到一个编译工具ProtoGen,在之前下载的protobuf-net r668.zip中就有。
为了方便管理.proto和.cs文件以及编译快捷,我们可以写一个bat脚本来实现自动编译.proto文件,脚本如下:
1 2 3 | @echo off for /f "delims=" %%i in ('dir /b proto "proto/*.proto"') do protogen -i:proto/%%i -o:cs/%%~ni.cs pause |
Netty4服务端心跳机制
星期六, 五月 17th, 2014 4,393 viewsNetty4与Netty3.x的心跳机制略有不同,在Netty4中已经去掉了IdleStateAwareChannelHandler这个类,但IdleStateHandler依旧保留,只是心跳超时的触发事件的写法略有不同,Netty底层实现了一套类似信号和槽的事件通信机制。
这里且看实现。
首先是在 SocketChannel.pipeline 中注册 IdleStateHandler 进行心跳时间的定制:
1 2 3 4 5 6 7 8 9 10 11 12 13 14 15 16 17 18 19 20 21 22 23 24 25 26 27 28 29 30 31 32 33 34 | // Configure the server. EventLoopGroup bossGroup = new NioEventLoopGroup(1); EventLoopGroup workerGroup = new NioEventLoopGroup(); try { ServerBootstrap b = new ServerBootstrap(); b.group(bossGroup, workerGroup) .channel(NioServerSocketChannel.class) .option(ChannelOption.SO_BACKLOG, 100) .handler(new LoggingHandler(LogLevel.INFO)) .childHandler(new ChannelInitializer<socketchannel>() { @Override public void initChannel(SocketChannel ch) throws Exception { ch.pipeline() .addLast( new LoggingHandler(LogLevel.INFO), new IdleStateHandler(30,0,0),// 心跳控制 new ServerHandler()); } }); // Start the server. ChannelFuture f = b.bind(port).sync(); // Wait until the server socket is closed. f.channel().closeFuture().sync(); } catch (InterruptedException e) { e.printStackTrace(); } finally { // Shut down all event loops to terminate all threads. bossGroup.shutdownGracefully(); workerGroup.shutdownGracefully(); } </socketchannel> |
这里要注意IdleStateHandler()要放在ServerHandler()的前面,否则心跳管理无法触发ServerHandler中的userEventTriggered()方法。
此时已经成功在服务器中创建了心跳控制器:
IdleStateHandler(int readerIdleTimeSeconds, int writerIdleTimeSeconds, int allIdleTimeSeconds)
| Property | Meaning |
|---|---|
| readerIdleTime | an IdleStateEvent whose state is IdleState.READER_IDLE will be triggered when no read was performed for the specified period of time. Specify 0to disable. |
| writerIdleTime | an IdleStateEvent whose state is IdleState.WRITER_IDLE will be triggered when no write was performed for the specified period of time. Specify 0 to disable. |
| allIdleTime | an IdleStateEvent whose state is IdleState.ALL_IDLE will be triggered when neither read nor write was performed for the specified period of time. Specify 0 to disable. |
Netty4客户端断线重连机制
星期五, 五月 16th, 2014 1,838 views首先要了解一下Netty4客户端的运行机制,NettyClient.java代码如下:
1 2 3 4 5 6 7 8 9 10 11 12 13 14 15 16 17 18 19 20 21 22 23 24 25 26 27 28 29 30 31 32 33 34 35 36 37 38 | public class NettyClient { private final String host; private final int port; public NettyClient(String host, int port) { this.host = host; this.port = port; } public void run() throws Exception { // Configure the client. EventLoopGroup group = new NioEventLoopGroup(); try { Bootstrap b = new Bootstrap(); b.group(group) .channel(NioSocketChannel.class) .option(ChannelOption.TCP_NODELAY, true) .handler(new ChannelInitializer<socketchannel>() { @Override public void initChannel(SocketChannel ch) throws Exception { ch.pipeline().addLast( //new LoggingHandler(LogLevel.INFO), new NettyHandler()); } }); // Start the client. ChannelFuture f = b.connect(host, port).sync(); // Wait until the connection is closed. f.channel().closeFuture().sync();//运行后会在这里阻塞 } finally { // Shut down the event loop to terminate all threads. group.shutdownGracefully(); } } } </socketchannel> |
当我们在主线程中执行 NettyClient(NettyClient).run()时,主线程会在 ChannelFuture f = b.connect(host, port).sync(); 这里阻塞,这是Netty4的一个新特性,我们利用这个特性即可创建一个定时器来实现断线重连的功能。
Protobuf-net在Unity WebPlayer中的兼容解决方案
星期四, 五月 15th, 2014 1,489 views由于项目需要所以使用了Unity + Protobuf。
但是问题随之而来,因为Protobuf是JIT运行时动态编译的,而Unity不支持这种运行时动态编译,同时Protobuf是基于.net2.0框架的,因此当项目发布在PC时,出现了异常:
1 2 3 4 5 6 7 8 9 10 | ArgumentOutOfRangeException: Argument is out of range. Parameter name: options at System.Text.RegularExpressions.Regex.validate_options (RegexOptions options) [0x0003a] in /Users/builduser/buildslave/monoAndRuntimeClassLibs/build/mcs/class/System/System.Text.RegularExpressions/Regex.cs:248 at System.Text.RegularExpressions.Regex..ctor (System.String pattern, RegexOptions options) [0x00017] in /Users/builduser/buildslave/monoAndRuntimeClassLibs/build/mcs/class/System/System.Text.RegularExpressions/Regex.cs:214 at Google.ProtocolBuffers.Descriptors.DescriptorPool..cctor () [0x00000] in :0 Rethrow as TypeInitializationException: An exception was thrown by the type initializer for Google.ProtocolBuffers.Descriptors.DescriptorPool ...... |
这里使用的是Protobuf-Csharp包,通过排查,在发布时将PlayerSetting中Api Compatibility Level 设置成.Net 2.0即可解决。
如图

但当需要发布到WebPlayer的时候,发现一个基本无解的问题——WebPlayer PlayerSetting中的Api Compatibility Level按钮是灰色的!只支持.Net 2.0 subset模式,因此发布后依然无法解决protobuf异常问题。
(更多…)
Protobuf在Java中的简单实例
星期日, 五月 11th, 2014 253 views关于protobuf的介绍请大家自行查看https://code.google.com/p/protobuf/,本篇直奔主题——如何实现一个最简protobuf的Demo
①定义协议格式
首先定义.proto文件,可参考https://developers.google.com/protocol-buffers/docs/proto
大体格式如下:
1 2 3 4 5 | package com.beitown.net.msg;//包名 message TestMsg { required int64 Id=1; required string Name=2; } |
每个字段后标记的“=1”、“=2”,是在二进制编码时使用的每个字段的唯一标识。在编码时,数字1~15要比大于它们的数字少一个字节,因此,作为一个优化选项,可以把1~15的数字用于常用的或重复性的元素。
将其保存为test.proto文件
②编译ProtocolBuffer
运行ProtocolBuffer编译器protoc来生成与.proto文件相关的类
首先我们已经有了一个protoc.exe文件(生成方式不再赘述,需要的可自行查找)
官方给出的编译语句为 protoc -I=$SRC_DIR –java_out=$DST_DIR $SRC_DIR/test.proto
打开cmd命令行窗口,先cd到protoc.exe所在文件夹为根文件夹,此时输出的java源码在根文件夹下的src子文件夹中,test.proto文件在proto子文件夹中,因此命令如下
1 | protoc --java_out=src proto/test.proto |
若出现提示 Expected top-level statement (e.g. “message”) 为编码格式问题,(win7下)解决方法是使用记事本打开后另存为ANSI格式。
编译通过后会在目标文件夹即可 src/com/beitown/net/msg 下生成一个Test.java文件,我们可以对这个类的操作来实现protobuf内容的读取和写入。
③创建Message实例-序列化
接下来将说明如何对上文中的Test类进行操作,上文中定义了TestMsg这个结构体,因此创建代码如下
1 2 3 | TestMsg msg = TestMsg.newBuilder().setId(001).setName("beitown").build(); msg.toByteArray(); //发送msg.toByteArray()字节流 |
这里的setID,setName即为protoc自动生成Test.java中自带的方法。以上即可看出对于自定数据结构我们已经无需再去关心其从二进制转为消息类的过程,即将开发从通信层剥离出来,程序只需要关心消息类的处理逻辑。
③读取Message实例-反序列化
1 2 3 4 5 | //接收到字节流 byte[] data = 二进制流对象转换的字节数组; TestMsg msg = TestMsg.parseFrom(data); int id = msg.getId(); String name = msg.getName(); |
以上即为一个protobuf在java中的简单运用实例,通过对字节数组的发送和接收来实现protobuf消息的通信。
本篇针对初次接触protobuf的朋友做为学习参考之用,更多高级应用请自行举一反三。
本篇到此,谢谢关注。
BeiTown
2014-05-11
一句话解决ASP.NET中文表单提交乱码问题
星期五, 十月 4th, 2013 37 views通常在.NET链接数据库使用中文做为SELECT的条件时,如果出现无法找到等异常情况,可以先确认一下是否是从表单提交过来的中文出现了乱码。
针对乱码我们可以尝试如下方法。
在Web.config中的
1 | <globalization requestEncoding="GB2312" responseEncoding="GB2312"/> |
OK一切搞定。
BeiTown
2013.10.04
ASP.NET使用GridView对数据库快速操作
星期四, 九月 19th, 2013 24 views①绑定及显示数据
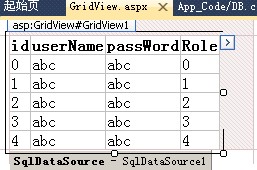
首先在界面中创建一个SqlDataSource和一个GridView控件,配置SqlDataSource绑定到指定数据库的某一个表(例如某test表)。接下来将这个数据源绑定到GridView中(自动生成需要的行列),效果如图
此时编译运行程序即可看到test表中的内容,这段界面的代码如下(自动生成)
1 2 3 4 5 6 7 8 9 10 11 12 13 14 15 16 17 18 | <asp:GridView ID="GridView1" runat="server" AutoGenerateColumns="False" DataKeyNames="id" DataSourceID="SqlDataSource1" style="margin-right: 34px"> <Columns> <asp:BoundField DataField="id" HeaderText="id" InsertVisible="False" ReadOnly="True" SortExpression="id" /> <asp:BoundField DataField="userName" HeaderText="userName" SortExpression="userName" /> <asp:BoundField DataField="passWord" HeaderText="passWord" SortExpression="passWord" /> <asp:BoundField DataField="Role" HeaderText="Role" SortExpression="Role" /> </Columns> </asp:GridView> <asp:SqlDataSource ID="SqlDataSource1" runat="server" ConnectionString="<%$ ConnectionStrings:mytestConnectionString %>" SelectCommand="SELECT * FROM [test] ORDER BY [id]"> </asp:SqlDataSource> |
②对数据进行编辑
如图点击GridView右侧的按钮添加一个列,在这个列中加入编辑按钮

此时会生成如下一段代码
1 | <asp:CommandField ShowEditButton="True" /> |
编译运行程序效果如图
点击界面上的[编辑]出现如图
即可对数据库test表的目标行进行修改,点击[修改]即可执行UPDATA命令。
以上即快速实现了一个对数据库表进行修改的Demo。
总结:
此方案的优点是开发异常迅速,基本不用编写代码即可完成对数据库表的显示、查询、以及修改。
但弊端也是由于代码编写量少,无法加入更多的逻辑内容。
BeiTown
2013.09.19
ASP.NET 数据库(SQL SERVER)操作的最简Demo
星期一, 九月 2nd, 2013 148 views首先创建一个数据库操作基类DB.cs
1 2 3 4 5 6 7 8 9 10 11 12 13 14 15 16 17 18 19 20 21 22 23 24 25 26 27 28 29 | using System; using System.Collections.Generic; using System.Linq; using System.Web; using System.Data.SqlClient; using System.Configuration; using System.Data; using System.Security.Cryptography; /// <summary> ///DB 的摘要说明 /// </summary> public class DB { public static string connectionString = ConfigurationManager.ConnectionStrings["ConnectionString"].ConnectionString; public DB(){} /// <summary> ///创建连接 /// </summary> public SqlConnection GetConnection() { return new SqlConnection(connectionString); } /// <summary> ///执行语句并返回行数 /// </summary> <a href="http://coder.beitown.com/archives/1014#more-1014" class="more-link">(更多...)</a> |
SQLSERVER 快速清空数据表方法
星期五, 八月 2nd, 2013 19 views在日常运维中我们常常会需要清空一些数据库的表数据,常规方法是使用DELETE语句
1 | DELETE FROM [表名] |
此方法的优点是可以根据条件删除数据(在表名后加where),但当需要全部清空一个表时使用此方法则会显得非常缓慢,因为DELETE是逐条删除的。
所以通常清空表时可以使用TRUNCATE TABLE来清空数据表
1 | TRUNCATE TABLE [表名] |
此方法无论数据库表有多少行数据都是秒删,其本质就是重建一个空表的意思。
当然有时候需要条件删除也可以使用此方法,即首先备份需要保留的数据到另一个临时表中,将本表清除后再将临时表的数据插入到本表中,方法如下
1 2 3 4 5 6 7 8 9 | IF object_id('tempdb..#[临时表]') IS NOT NULL --确认是否已存在 BEGIN DROP TABLE #temp_table --删除待用临时表 END SELECT * INTO #临时表 FROM [本表] WHERE 条件 --创建临时表并拷贝数据 TRUNCATE TABLE [本表] --重建表 INSERT [本表] SELECT * FROM #临时表 --将临时表插入本表 DROP TABLE #临时表 --删除临时表 |
更多SQL操作技巧欢迎交流讨论,谢谢关注。
BeiTown
2013.08.02


